Difference between revisions of "Accessory Attachments"
MyraMidnight (talk | contribs) |
|||
| (31 intermediate revisions by 5 users not shown) | |||
| Line 1: | Line 1: | ||
[[Category:Krafties Creatures]][[Category:Vocabulary]][[Category:Tutorials]] | [[Category:Krafties Creatures]][[Category:Vocabulary]][[Category:Tutorials]] | ||
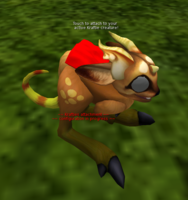
[[File:Avian-Hat.PNG|thumb|300px|[[Aviaa]] wearing an attachment]] | [[File:Avian-Hat.PNG|thumb|300px|[[Aviaa]] wearing an attachment]] | ||
| − | :;Not to be confused with the [[Necessity Pack]] | + | :;Not to be confused with the "Creature Attachment" from the [[Necessity Pack]] |
'''Attachments''' refers to ''accessories/clothing'' that your pet can wear to appear unique. | '''Attachments''' refers to ''accessories/clothing'' that your pet can wear to appear unique. | ||
In the simplest terms, the attachments for Krafties critters are items that they can either wear or carry. Used to customize and personalize your critter to your own style and personality. The possibilities for the single attachments are all but limitless, if you can envision it, you can create it. In the future, Krafties will allow for multiple attachments, for now however Krafties Critters have a single attachment system that allows for the freedom of personal expression as well as an attachment creator Kit that is purchased at the [[Krafties Store]] for 1$L. | In the simplest terms, the attachments for Krafties critters are items that they can either wear or carry. Used to customize and personalize your critter to your own style and personality. The possibilities for the single attachments are all but limitless, if you can envision it, you can create it. In the future, Krafties will allow for multiple attachments, for now however Krafties Critters have a single attachment system that allows for the freedom of personal expression as well as an attachment creator Kit that is purchased at the [[Krafties Store]] for 1$L. | ||
| Line 16: | Line 16: | ||
{| class=bluetable style="width:200px;margin-left:30px" | {| class=bluetable style="width:200px;margin-left:30px" | ||
| − | !Krafties Species !!Prim limit | + | !Krafties Species !!Prim limit !!Ascension Change |
|- | |- | ||
| − | |[[ | + | |[[Antler Stufflie]] ||style="text-align:center"|4||style="text-align:center"|No |
|- | |- | ||
| − | |[[ | + | |[[Appum]] ||style="text-align:center"|5||style="text-align:center"|No |
|- | |- | ||
| − | |[[ | + | |[[Aquine]] ||style="text-align:center"|5||style="text-align:center"|No |
|- | |- | ||
| − | |[[ | + | |[[Aviaa]] ||style="text-align:center"|4||style="text-align:center"|Yes |
|- | |- | ||
| − | |[[ | + | |[[Balooflie]] ||style="text-align:center"|5||style="text-align:center"|No |
|- | |- | ||
| − | |[[ | + | |[[Beetlie]] ||style="text-align:center"|4||style="text-align:center"|Yes |
|- | |- | ||
| − | |[[ | + | |[[Blizzkin]] ||style="text-align:center"|7||style="text-align:center"|No |
|- | |- | ||
| − | |[[ | + | |[[Cheepsie]] ||style="text-align:center"|5||style="text-align:center"|No |
|- | |- | ||
| − | |[[ | + | |[[Cookie Reinakin]] ||style="text-align:center"|4||style="text-align:center"|No |
|- | |- | ||
| − | |[[ | + | |[[Cookie Stufflie]] ||style="text-align:center"|5||style="text-align:center"|No |
|- | |- | ||
| − | |[[ | + | |[[DalDragoonix]] ||style="text-align:center"|3||style="text-align:center"|No |
|- | |- | ||
| − | |[[Spyrron]] ||style="text-align:center"|9 | + | |[[Dazmer]] ||style="text-align:center"|4||style="text-align:center"|No |
| + | |- | ||
| + | |[[Dolphixx]] ||style="text-align:center"|5||style="text-align:center"|No | ||
| + | |- | ||
| + | |[[Eggsie]] ||style="text-align:center"|8||style="text-align:center"|No | ||
| + | |- | ||
| + | |[[Eletrixx]] ||style="text-align:center"|6||style="text-align:center"|Yes | ||
| + | |- | ||
| + | |[[Felion]] ||style="text-align:center"|4||style="text-align:center"|Yes | ||
| + | |- | ||
| + | |[[Flutterboo]] ||style="text-align:center"|4||style="text-align:center"|No | ||
| + | |- | ||
| + | |[[Fooflies]] ||style="text-align:center"|5||style="text-align:center"|No | ||
| + | |- | ||
| + | |[[Fuffit]] ||style="text-align:center"|6||style="text-align:center"|Yes | ||
| + | |- | ||
| + | |[[Giruffkin]] ||style="text-align:center"|3||style="text-align:center"|Yes | ||
| + | |- | ||
| + | |[[Hoppity]] ||style="text-align:center"|4||style="text-align:center"|No | ||
| + | |- | ||
| + | |[[Hopster]] ||style="text-align:center"|4||style="text-align:center"|Yes | ||
| + | |- | ||
| + | |[[Koalie]] ||style="text-align:center"|5||style="text-align:center"|Yes | ||
| + | |- | ||
| + | |[[Lunaris]] ||style="text-align:center"|4||style="text-align:center"|Yes | ||
| + | |- | ||
| + | |[[Lupix]] ||style="text-align:center"|4||style="text-align:center"|Yes | ||
| + | |- | ||
| + | |[[Maihai]] ||style="text-align:center"|5||style="text-align:center"|No | ||
| + | |- | ||
| + | |[[Mer Stufflie]] ||style="text-align:center"|4||style="text-align:center"|No | ||
| + | |- | ||
| + | |[[Munkle]] ||style="text-align:center"|3||style="text-align:center"|Yes | ||
| + | |- | ||
| + | |[[Mushumm]] ||style="text-align:center"|5||style="text-align:center"|No | ||
| + | |- | ||
| + | |[[NalDragoonix]] ||style="text-align:center"|3||style="text-align:center"|No | ||
| + | |- | ||
| + | |[[Orcat]] ||style="text-align:center"|5||style="text-align:center"|No | ||
| + | |- | ||
| + | |[[Paintbrush Fooflies]] ||style="text-align:center"|4||style="text-align:center"|No | ||
| + | |- | ||
| + | |[[Pandaire]] ||style="text-align:center"|5||style="text-align:center"|Yes | ||
| + | |- | ||
| + | |[[Penglin]] ||style="text-align:center"|5||style="text-align:center"|Yes | ||
| + | |- | ||
| + | |[[Plush Felion]] ||style="text-align:center"|4||style="text-align:center"|No | ||
| + | |- | ||
| + | |[[Plush Lupix]] ||style="text-align:center"|4||style="text-align:center"|No | ||
| + | |- | ||
| + | |[[Plush Rexie]] ||style="text-align:center"|5||style="text-align:center"|No | ||
| + | |- | ||
| + | |[[Puffalixx]] ||style="text-align:center"|5||style="text-align:center"|No | ||
| + | |- | ||
| + | |[[Pumpkie]] ||style="text-align:center"|8||style="text-align:center"|No | ||
| + | |- | ||
| + | |[[Rascune]] ||style="text-align:center"|4||style="text-align:center"|Yes | ||
| + | |- | ||
| + | |[[Reinakin]] ||style="text-align:center"|2||style="text-align:center"|No | ||
| + | |- | ||
| + | |[[Rexie]] ||style="text-align:center"|3||style="text-align:center"|Yes | ||
| + | |- | ||
| + | |[[Rose Timbuls]] ||style="text-align:center"|2||style="text-align:center"|No | ||
| + | |- | ||
| + | |[[Shark Stufflie]] ||style="text-align:center"|3||style="text-align:center"|No | ||
| + | |- | ||
| + | |[[Sprit]] ||style="text-align:center"|2||style="text-align:center"|No | ||
| + | |- | ||
| + | |[[Spyrron]] ||style="text-align:center"|9||style="text-align:center"|Yes | ||
| + | |- | ||
| + | |[[Stufflie]] ||style="text-align:center"|4||style="text-align:center"|Yes | ||
| + | |- | ||
| + | |[[Talum]] ||style="text-align:center"|4||style="text-align:center"|No | ||
| + | |- | ||
| + | |[[Tortixx]] ||style="text-align:center"|2||style="text-align:center"|Yes | ||
| + | |- | ||
| + | |[[Tricornixx]] ||style="text-align:center"|2||style="text-align:center"|Yes | ||
| + | |- | ||
| + | |[[Tusker]] ||style="text-align:center"|2||style="text-align:center"|Yes | ||
| + | |- | ||
| + | |[[ValDragoonix]] ||style="text-align:center"|3||style="text-align:center"|No | ||
| + | |- | ||
| + | |[[Vulpup]] ||style="text-align:center"|3||style="text-align:center"|No | ||
| + | |- | ||
| + | |[[Winged Stufflie]] ||style="text-align:center"|3||style="text-align:center"|No | ||
| + | |- | ||
| + | |[[Winged Vulpup]] ||style="text-align:center"|1||style="text-align:center"|No | ||
| + | |- | ||
| + | |[[Woolxie]] ||style="text-align:center"|4||style="text-align:center"|No | ||
|- | |- | ||
| − | |||
|} | |} | ||
==Designing Attachments== | ==Designing Attachments== | ||
| − | |||
| − | |||
| − | |||
| − | |||
| − | |||
| − | |||
The Krafties '''Attachment Design system''' allows you to create objects that visually attach themselves to Krafties creatures, following a specified attachment point in all of the creature's actions. Basically, you can design clothing and accessories that can be worn on Krafties creatures all over Second Life. As we add more species of Krafties, your attachment design system will automatically be updated with the templates for the new creatures. | The Krafties '''Attachment Design system''' allows you to create objects that visually attach themselves to Krafties creatures, following a specified attachment point in all of the creature's actions. Basically, you can design clothing and accessories that can be worn on Krafties creatures all over Second Life. As we add more species of Krafties, your attachment design system will automatically be updated with the templates for the new creatures. | ||
===Using the Attachment Designer v4.0=== | ===Using the Attachment Designer v4.0=== | ||
| − | :# Create a | + | :# Create a ''1 prim '''sculpted''' object'' (''mesh'' is not supported) |
| − | + | :## You can design it in your favorite 3d modeling program | |
| − | :# ''Upload the sculpt files'' to Second Life, and apply them to a new prim | + | :## ''Upload the sculpt files'' to Second Life, and apply them to a new prim |
:# Rez the included ''Krafties Attachment Designer'' object in world | :# Rez the included ''Krafties Attachment Designer'' object in world | ||
:# Get the ''"Krafties Attachment Script"'' | :# Get the ''"Krafties Attachment Script"'' | ||
| Line 65: | Line 146: | ||
:# Drop the ''Krafties Attachment Script'' '''into the contents''' your newly created sculpted prim | :# Drop the ''Krafties Attachment Script'' '''into the contents''' your newly created sculpted prim | ||
:#*It cannot be a linked object, only 1 prim. | :#*It cannot be a linked object, only 1 prim. | ||
| − | :# If the steps have been followed correctly and you have full permissions, you will get a message and ''floating text will appear above the object'' | + | :#*If the steps have been followed correctly and you have full permissions, you will get a message and ''floating text will appear above the object'' |
| − | :# Select the ''[[Krafties Creatures|Krafties species]]'' | + | :# Select the desired ''[[Krafties Creatures|Krafties species]]'' on the ''Attachment Designer'' |
:## Touch the ''Krafties Attachment Designer'' | :## Touch the ''Krafties Attachment Designer'' | ||
| − | :## Select which species of Kraftie | + | :## Select which species of Kraftie you wish to design the attachment for |
:##After a few moments, the designer will transform into a template version of the species you have chosen | :##After a few moments, the designer will transform into a template version of the species you have chosen | ||
:# Position your sculpted object in the desired position and rotation on the template creature | :# Position your sculpted object in the desired position and rotation on the template creature | ||
| − | :# | + | :# Touch the ''body part'' on the template creature that you would like to have your object attach to |
| − | :# Click '''Finalize''' | + | :#*The selected ''body part'' will turn black |
| + | :#*A [[Script Dialog|Dialog menu]] will open | ||
| + | :# Click '''Finalize''' when you are satisfied | ||
:#* You're finished! | :#* You're finished! | ||
:After completing the design process, the object you dropped the 'Krafties Attachment Script' into has changed into a ready to use Krafties attachment with no further changes needed on your end (except for perms, if you are reselling your creations). Clicking the attachment will result in a dialog asking if you would like to attach it to your currently active Kraftie, as it will for anyone that give/sell the object to. Click 'Yes', and your creature will display the newly created attachment! | :After completing the design process, the object you dropped the 'Krafties Attachment Script' into has changed into a ready to use Krafties attachment with no further changes needed on your end (except for perms, if you are reselling your creations). Clicking the attachment will result in a dialog asking if you would like to attach it to your currently active Kraftie, as it will for anyone that give/sell the object to. Click 'Yes', and your creature will display the newly created attachment! | ||
| − | |||
:;IMPORTANT NOTES | :;IMPORTANT NOTES | ||
| Line 85: | Line 167: | ||
:* Because a Krafties attachment is created with a certain species template, that same attachment will NOT work with other species of Krafties. You may, however, use the same sculpt to create an attachment for each species of Kraftue. | :* Because a Krafties attachment is created with a certain species template, that same attachment will NOT work with other species of Krafties. You may, however, use the same sculpt to create an attachment for each species of Kraftue. | ||
:* At any time a certain specie's appearance data may be altered by the Krafties developers, which may or may not effect the look and positioning of your created attachments. With this in mind, it is best to include some method to update your products if you are reselling Krafties attachments. On our part, the Krafties development team will update appearances sparingly, if ever, in order to avoid any breakage in products it may cause. | :* At any time a certain specie's appearance data may be altered by the Krafties developers, which may or may not effect the look and positioning of your created attachments. With this in mind, it is best to include some method to update your products if you are reselling Krafties attachments. On our part, the Krafties development team will update appearances sparingly, if ever, in order to avoid any breakage in products it may cause. | ||
| + | |||
| + | ====Pictures of the Attachment Designer in use==== | ||
| + | <gallery heights=200px widths=200px > | ||
| + | File:Attachment Designer.png|The designer with it's [[Script Dialog|dialog menu]] | ||
| + | File:Attachment Designer loading.png|The designer loading a species template | ||
| + | File:Attachment Designer ready.png|A [[Hopster]] loaded and ready | ||
| + | File:Attachment Designer attach.png|The chosen ''body part'' turns black | ||
| + | File:Attachment Designer finalized.png|Attachment '''finalized''' and ready for use | ||
| + | </gallery> | ||
| + | |||
| + | {{clear}} | ||
=See Also= | =See Also= | ||
Latest revision as of 12:49, 9 December 2022

- Not to be confused with the "Creature Attachment" from the Necessity Pack
Attachments refers to accessories/clothing that your pet can wear to appear unique. In the simplest terms, the attachments for Krafties critters are items that they can either wear or carry. Used to customize and personalize your critter to your own style and personality. The possibilities for the single attachments are all but limitless, if you can envision it, you can create it. In the future, Krafties will allow for multiple attachments, for now however Krafties Critters have a single attachment system that allows for the freedom of personal expression as well as an attachment creator Kit that is purchased at the Krafties Store for 1$L.
Applying Attachments to Pet[edit]
- Simply rez the Attachment you wish to apply to your Active Krafties Pet
- Touch the attachment
- Click Wear
- The Item will Rez to the appropriate spot on your Critter and require no adjustments or further attention.
- To remove all attachments from your Kraftie, click "Strip" from the Pet Menu
Attachment prim limits[edit]
Different species of Krafties have different prim limits for attachments, meaning how many attachments the creature can have at once
| Krafties Species | Prim limit | Ascension Change |
|---|---|---|
| Antler Stufflie | 4 | No |
| Appum | 5 | No |
| Aquine | 5 | No |
| Aviaa | 4 | Yes |
| Balooflie | 5 | No |
| Beetlie | 4 | Yes |
| Blizzkin | 7 | No |
| Cheepsie | 5 | No |
| Cookie Reinakin | 4 | No |
| Cookie Stufflie | 5 | No |
| DalDragoonix | 3 | No |
| Dazmer | 4 | No |
| Dolphixx | 5 | No |
| Eggsie | 8 | No |
| Eletrixx | 6 | Yes |
| Felion | 4 | Yes |
| Flutterboo | 4 | No |
| Fooflies | 5 | No |
| Fuffit | 6 | Yes |
| Giruffkin | 3 | Yes |
| Hoppity | 4 | No |
| Hopster | 4 | Yes |
| Koalie | 5 | Yes |
| Lunaris | 4 | Yes |
| Lupix | 4 | Yes |
| Maihai | 5 | No |
| Mer Stufflie | 4 | No |
| Munkle | 3 | Yes |
| Mushumm | 5 | No |
| NalDragoonix | 3 | No |
| Orcat | 5 | No |
| Paintbrush Fooflies | 4 | No |
| Pandaire | 5 | Yes |
| Penglin | 5 | Yes |
| Plush Felion | 4 | No |
| Plush Lupix | 4 | No |
| Plush Rexie | 5 | No |
| Puffalixx | 5 | No |
| Pumpkie | 8 | No |
| Rascune | 4 | Yes |
| Reinakin | 2 | No |
| Rexie | 3 | Yes |
| Rose Timbuls | 2 | No |
| Shark Stufflie | 3 | No |
| Sprit | 2 | No |
| Spyrron | 9 | Yes |
| Stufflie | 4 | Yes |
| Talum | 4 | No |
| Tortixx | 2 | Yes |
| Tricornixx | 2 | Yes |
| Tusker | 2 | Yes |
| ValDragoonix | 3 | No |
| Vulpup | 3 | No |
| Winged Stufflie | 3 | No |
| Winged Vulpup | 1 | No |
| Woolxie | 4 | No |
Designing Attachments[edit]
The Krafties Attachment Design system allows you to create objects that visually attach themselves to Krafties creatures, following a specified attachment point in all of the creature's actions. Basically, you can design clothing and accessories that can be worn on Krafties creatures all over Second Life. As we add more species of Krafties, your attachment design system will automatically be updated with the templates for the new creatures.
Using the Attachment Designer v4.0[edit]
- Create a 1 prim sculpted object (mesh is not supported)
- You can design it in your favorite 3d modeling program
- Upload the sculpt files to Second Life, and apply them to a new prim
- Rez the included Krafties Attachment Designer object in world
- Get the "Krafties Attachment Script"
- Touch the Attachment Designer
- Click "Get Script"
- Accept the delivered script
- Drop the Krafties Attachment Script into the contents your newly created sculpted prim
- It cannot be a linked object, only 1 prim.
- If the steps have been followed correctly and you have full permissions, you will get a message and floating text will appear above the object
- Select the desired Krafties species on the Attachment Designer
- Touch the Krafties Attachment Designer
- Select which species of Kraftie you wish to design the attachment for
- After a few moments, the designer will transform into a template version of the species you have chosen
- Position your sculpted object in the desired position and rotation on the template creature
- Touch the body part on the template creature that you would like to have your object attach to
- The selected body part will turn black
- A Dialog menu will open
- Click Finalize when you are satisfied
- You're finished!
- Create a 1 prim sculpted object (mesh is not supported)
- After completing the design process, the object you dropped the 'Krafties Attachment Script' into has changed into a ready to use Krafties attachment with no further changes needed on your end (except for perms, if you are reselling your creations). Clicking the attachment will result in a dialog asking if you would like to attach it to your currently active Kraftie, as it will for anyone that give/sell the object to. Click 'Yes', and your creature will display the newly created attachment!
- IMPORTANT NOTES
- DO NOT CHANGE THE OBJECT'S DESCRIPTION AFTER FINALIZING THE DESIGN PROCESS. This will result in your attachment not functioning properly
- Krafties currently only support one prim, sculpted objects as design attachments. This may or may not change in the future
- You must have full permissions on the object in order to turn it into a Krafties Attachment
- Currently, a Krafties attachment has unlimited uses. As such it can be attached to multiple creatures as many times as the owner wishes. Keep this in mind when selling the attachments. This may or may not chage in the future.
- Because a Krafties attachment is created with a certain species template, that same attachment will NOT work with other species of Krafties. You may, however, use the same sculpt to create an attachment for each species of Kraftue.
- At any time a certain specie's appearance data may be altered by the Krafties developers, which may or may not effect the look and positioning of your created attachments. With this in mind, it is best to include some method to update your products if you are reselling Krafties attachments. On our part, the Krafties development team will update appearances sparingly, if ever, in order to avoid any breakage in products it may cause.
Pictures of the Attachment Designer in use[edit]
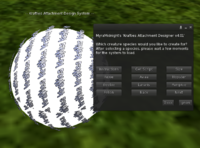
The designer with it's dialog menu
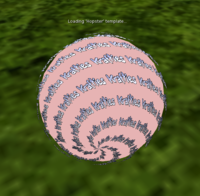
The designer loading a species template
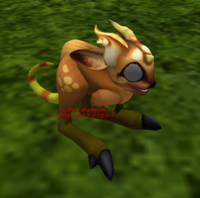
A Hopster loaded and ready
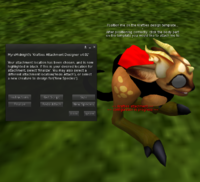
The chosen body part turns black
Attachment finalized and ready for use


See Also[edit]
| Krafties Creatures | ||||
|---|---|---|---|---|
| Wild Creatures | Aviaa • Rexie • Beetlie • Hopster • Lunaris • Felion • Lupix • Penglin • Pandaire • Spyrron • Tortixx • Giruffkin • Fuffit • Stufflie • Racsune • Koalie • Munkle • Dazmer • Woolxie | |||
| Enchanted Creatures | Tusker • Eletrixx • Blizzkin | |||
| Limited Creatures | Eggsie • Pumpkie • Blizzkin | |||
| Related Items | Capture Net • Unbonded • Home Temple • Giant Temple • Attachments | |||
| Souls and Elements | ||||
| Basic Elements | Fire • Wind • Earth • Water | |||
| Hybrid Elements | Ice • Lightning • Plant • Sand • Steam • Volcanic | |||
| Special Elements | Mind • Affection • Vampire • Rainbow • Nuclear | |||
| Limited Edition Elements | Peppermint | |||
| Other Elements | Wild | |||
| Crafting Souls • Bonding • Elemental Affinity • Krafties Pets • Spells | ||||
Trivia[edit]
- Did you know that originally the pets were limited to only 1 attachment it could wear at a time?